
How to Staple a Passport Photo to the Application: DS-11, DS-82, Staple Placement and Damage
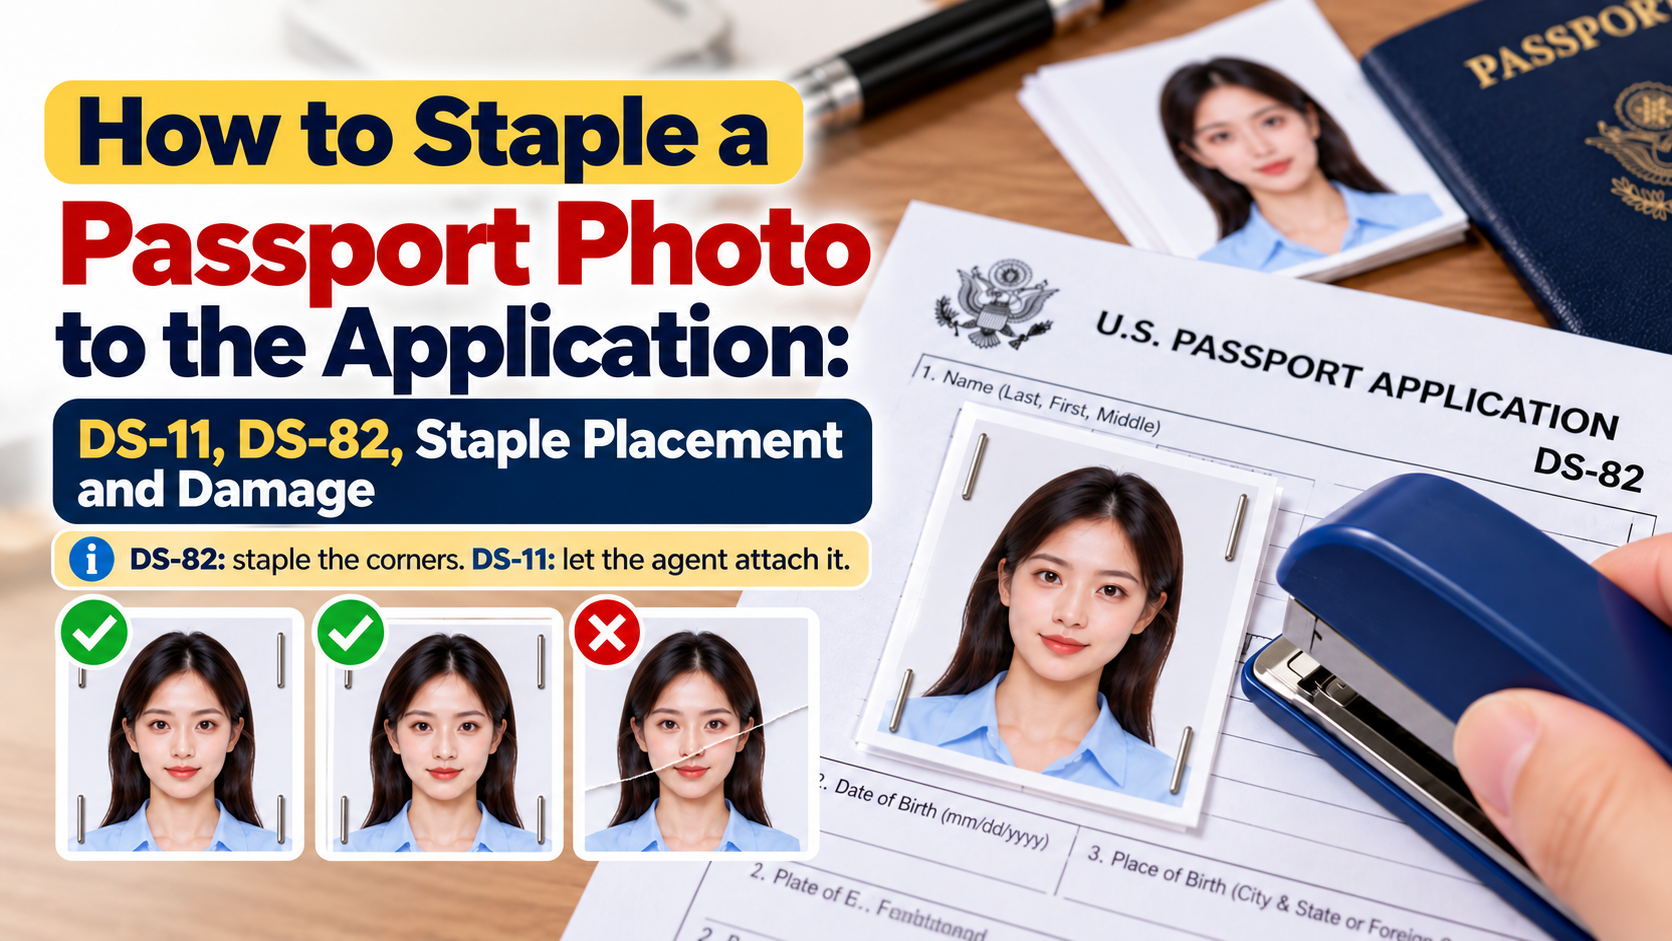
DS-82 mail renewals use four vertical corner staples; DS-11 applicants bring a loose photo. Check form instructions, photo placement and damage.
Quick Answer
Whether you staple the photo depends on which form you use.
- DS-82 (renewal by mail): you attach the photo yourself, with four vertical staples, one near each outer corner, inside the photo space on the application.
- DS-11 (first-time applicants, in person): don't staple it yourself. The acceptance agent attaches the photo at the counter. State Department procedures for agents call for four vertical staples, one near each outer corner, within the space provided.
- Online renewal: there is nothing to staple, because you upload a digital photo.
Don't use glue, tape or paper clips, don't bend the photo, and keep staples out of the face area.
Cover illustration corrected to show DS-82. Follow the official form template for exact placement; DS-11 applicants leave attachment to the agent. Checked October 15, 2026. Instructions can change when the State Department updates its forms. Always read the instruction page of the current form you are using, and check travel.state.gov if anything looks different.
Which Form Are You Using?
| Situation | Form | Who attaches the photo? | What to bring or send |
|---|---|---|---|
| First passport, under 16, or you can't renew by mail | DS-11 | The acceptance agent staples it at your appointment | One loose 2x2 printed photo, unstapled |
| Renewing a passport by mail | DS-82 | You | One 2x2 photo, stapled to the form |
| Renewing online | Online renewal | Nobody, you upload a digital photo | A digital photo file |
If you aren't sure which form applies, read our guide on DS-11 vs. DS-82 and our walkthrough on how to expedite a first-time passport.
DS-11: Don't Staple It Yourself
If you are applying in person on Form DS-11, bring your photo loose. The acceptance agent reviews it, checks it against the requirements, and attaches it to the application. State Department standard procedures for agents say to staple the photo to the DS-11 within the space provided, with four staples, one in each corner.
Why not do it yourself?
- The agent may reject the photo, which forces you to replace it. Removing staples can leave damage, so do not assume it can be reused.
- Staple holes and marks can damage a photo you might need to reuse.
- An extra print can be useful if the first has a problem, but the application calls for one photo. Keep any spare separate and let the agent select and attach the required photo.
Also note that the DS-11 must be signed in front of the agent, so don't finish the form before your appointment.
DS-82: How to Staple Your Photo Step by Step
For mail-in renewals on Form DS-82, you attach the photo before you send the application.
- Print the form correctly. Print the DS-82 single-sided on standard 8.5 x 11 inch paper. Use the State Department's form filler to complete the form, and print it. If the Form Filler has technical problems, the official forms page offers a PDF alternative; follow that version's current filling instructions. Do not add handwritten corrections to a Form Filler-generated form. Sign and date where indicated.
- Check your photo before you attach it. It must be a single 2x2 inch color photo printed on photo paper, taken within the last 6 months, and it must meet the current requirements. Our guide to passport photo requirements lists every rule.
- Find the photo space. On the application, look for the box marked for the photograph. The form shows the placement for the photo. Don't attach the photo anywhere else on the page.
- Place the photo flat in the box, straight and centered, with its edges inside the space.
- Use four vertical staples, one at each corner, as close to the outer edges as possible. Follow the template on the application rather than an unofficial photo or a generic diagram. Keep the staples away from the face.
- Keep the photo flat. Don't bend, fold or crease it. State Department instructions say not to bend the photo.
- Keep staples out of the face. Place them close to the corners, in the border or background area, not near your eyes, nose, mouth or chin.
- Check the back of the page. Make sure the staple prongs are folded down flat so they don't scratch or puncture other pages.
- Mail the application in an envelope that doesn't require folding the form, with your most recent passport, fees and any supporting documents.
Where to staple: the short version
| Do | Don't |
|---|---|
| Use four vertical staples near the outer corners | Staple through the face or center of the image |
| Staple inside the photo box on the form | Staple the photo onto a separate sheet |
| Use standard staples and press firmly | Use paper clips, binder clips or pins |
| Keep the photo flat | Bend, fold or crease the photo |
| Use one photo only | Attach several photos |
Can You Glue or Tape a Passport Photo to the Application?
For DS-82, follow the instructed staple method instead of improvising an adhesive or clip attachment. For DS-11, bring the photo loose. The official renewal instructions call for staples; this guide does not claim that each alternative is separately named in an official prohibition. Avoid substituting glue, tape, glue sticks or clips. Here is why:
- Adhesive can damage the photo or the form when the photo is removed, which makes it hard for staff to inspect or replace it.
- It can bubble, warp or discolor the image, which can lead to rejection.
- It may cause a delay if staff can't verify the photo or it comes loose in the mail.
If you have already glued or taped the photo, don't try to peel it off. Contact the National Passport Information Center at 1-877-487-2778 to ask what to do. If your photo is damaged or unclear, you may need to print a new one and start with a clean form.
Passport Photo Staple Damage: What Counts and How to Avoid It
A staple isn't a problem by itself, when it follows the DS-82 attachment instructions. Extra holes, tears or facial damage are different from the four intended corner attachment points. Problems arise when the staple damages the image.
What counts as a problem
- A staple that passes through your face, eyes, nose or mouth
- A crease, tear or crimp that crosses your face
- Bent or warped corners that make the photo no longer flat
- Rust or ink marks from low-quality staples
- Holes from earlier staples or pins
How to prevent it
- Staple close to the corners, not toward the middle.
- Use a standard office stapler with the paper laid flat on a firm surface. Press down evenly.
- Practice on scrap paper so you know where the staple will land.
- Print a spare. Having a second print means a bad staple doesn't cost you the application. A prepared 4x6 sheet can hold a spare. Confirm the selected download's layout and measure each final 2x2 print; the larger sheet is not itself the photo you submit.
- Don't re-staple. If you misplace a staple, don't try to pull it out and reuse the photo. Print a fresh one.
What if the staple damaged your face area?
The State Department can reject a damaged photo and ask you for a replacement, which delays your application. If you catch the problem before you mail the form, replace the photo. If you've already submitted it, check your status and respond promptly to any request from the department.
What If You Forgot to Staple It, or the Photo Came Loose?
- Before you mail it: staple it correctly to the box on the form.
- If you already mailed it loose or it may have fallen out: do not assume staff can match a detached image to your application. Check official status messages and contact the National Passport Information Center at 1-877-487-2778 for instructions. Do not send a second full application or unsolicited replacement materials.
- If you used a sticker or adhesive: see the section above and ask NPIC for guidance.
Common Mistakes When Attaching a Passport Photo
- Stapling a DS-11 photo at home when the agent will do it
- Using glue, tape, a paper clip or a sticker instead of staples
- Stapling through the face or the center of the photo
- Bending or creasing the photo while stapling
- Attaching the photo to the wrong page or outside the photo box
- Submitting more than one photo
- Using a photo printed on plain paper or with a home printer on thin paper that tears around staples
- Not checking the back, leaving sharp prongs that snag other pages or the envelope
- Using an old form version with outdated instructions
Printing a Photo That Holds Up to Staples
Thin, glossy-coated paper can crack at the corners, and cheap plain paper isn't acceptable. Use photo paper with a glossy or matte finish. If you print at a store, order a 4x6 sheet with two photos centered and cut them to exactly 2x2 inches. For store-printing steps, see our guide to printing a passport photo from your own file.
Before you print, check your photo's size, background and head position with PhotoOmni, as part of preparation, then compare the result with the official rules. A tool does not guarantee government approval; use an original suitable photo without facial retouching or digital background replacement.
Frequently Asked Questions
Do I staple my passport photo to the application?
It depends on the form. For a DS-82 mail renewal, yes, you staple it. For a DS-11 in-person application, no: the acceptance agent attaches it. For online renewal, there is nothing to staple.
How many staples do I use?
For a DS-82 mail renewal, use four vertically oriented staples near the outer corners, following the current form's template. DS-11 applicants leave attachment to the agent.
Where do I staple the passport photo?
Within the photo box on the application, at the four corners of the photo, away from the face.
How do I staple a photo to a DS-82?
Place one 2x2 photo flat in the template on Application Page 1 and use four vertical staples close to the outer corners. This refers to the application page, not the first instruction page of the PDF. See the step-by-step instructions above.
Where is the DS-11 photo attached?
In the photo space on the DS-11. The acceptance agent does this during your appointment, using four staples, one in each corner, according to State Department procedures.
Can I glue my passport photo to the application?
Don't. Staples are the instructed method. If you've already used glue or tape, call the National Passport Information Center at 1-877-487-2778.
Can I use tape or a paper clip?
For DS-82, use the instructed staples rather than tape or a paper clip. For DS-11, do not attach the photo yourself.
Will staples damage my passport photo?
They shouldn't, if they are placed in the corners and away from your face. A staple through your face or a creased photo can cause problems, so print a spare.
Can I staple a digital photo?
No. Digital photos are uploaded for online renewal. Stapling applies only to a printed photo on a paper application.
What if my photo fell off in the mail?
Contact the National Passport Information Center at 1-877-487-2778 and ask how to proceed. You may be asked to send a replacement.
Bottom Line
Staple it yourself only if you're renewing by mail with a DS-82: four vertical staples near the outer corners, in the photo box, with nothing through your face. For a first-time DS-11 application, bring the photo loose and let the agent attach it. Skip glue and tape, keep the photo flat, and bring a spare. To make sure the photo itself is compliant before you print, check it with PhotoOmni.
Official Sources
- State Department: renewing by mail and photo attachment
- State Department: adult DS-11 applicants leave photo attachment to the agent
- State Department: forms, printing instructions and PDF alternative
- State Department: photo requirements and damage examples
- National Passport Information Center and contact details
About the Author
PhotoOmni Editorial Team
The PhotoOmni Editorial Team researches official passport, visa, immigration, and identity-photo requirements. Every guide is reviewed for practical accuracy and updated when application rules, upload specifications, or government guidance change.