
Passport Photo on 4x6 Paper: Layout Diagrams, Pixel Sizes and Print Settings
Compare 4x6 passport photo layouts, use exact pixel positions, print at actual size and measure each 2x2 photo before cutting.
Quick Answer
A 4x6 inch print is a convenient way to print 2x2 inch passport photos, because it is the cheapest standard print size at most photo counters and home printers. The key facts:
- A 4x6 sheet is exactly two 2-inch photos wide, so photos placed side by side leave no margin.
- The safest layout for a 4x6 sheet is two photos stacked in a centered column, with a 1 inch margin on every side.
- You can fit six photos on a 4x6 sheet (2 across, 3 down), but only edge to edge, which is risky if the printer trims the borders.
- For six photos with safe margins, use 5x7 paper.
- Whatever you choose, build the sheet at 300 DPI (1200 x 1800 pixels for 4x6), print at 100% / actual size, and measure each printed photo with a ruler: it must be exactly 2 x 2 inches.
This guide is about layout and printing. The photo itself must already meet the State Department's requirements (size, head position, background, expression). See our guide to US passport photo requirements first, and our article on printing a passport photo from your own file for store-by-store ordering steps.
The Geometry Most Guides Skip
Most 4x6 guides say "it fits four" or "it fits six" without showing why, and the answers conflict. The arithmetic is simple:
| Width | Height | |
|---|---|---|
| 4x6 sheet (portrait) | 4 in | 6 in |
| One passport photo | 2 in | 2 in |
| Photos that fit across / down | 4 ÷ 2 = 2 | 6 ÷ 2 = 3 |
| Maximum on a 4x6 sheet | 2 x 3 = 6 photos |
Two consequences:
- Six photos use the entire sheet. There is no room for margins or cut guides.
- A "2 x 2 grid of four photos" is 4 inches wide, so it still touches both side edges of a 4x6 sheet. It only leaves margins at the top and bottom.
Those margins matter because photo machines and printers don't always print the full image. Many trim or crop a small amount around the edges, and the amount varies by machine and by the "borderless" or "fit" settings you choose. If an outer photo loses even a sliver on one side, it may print smaller than 2 inches.
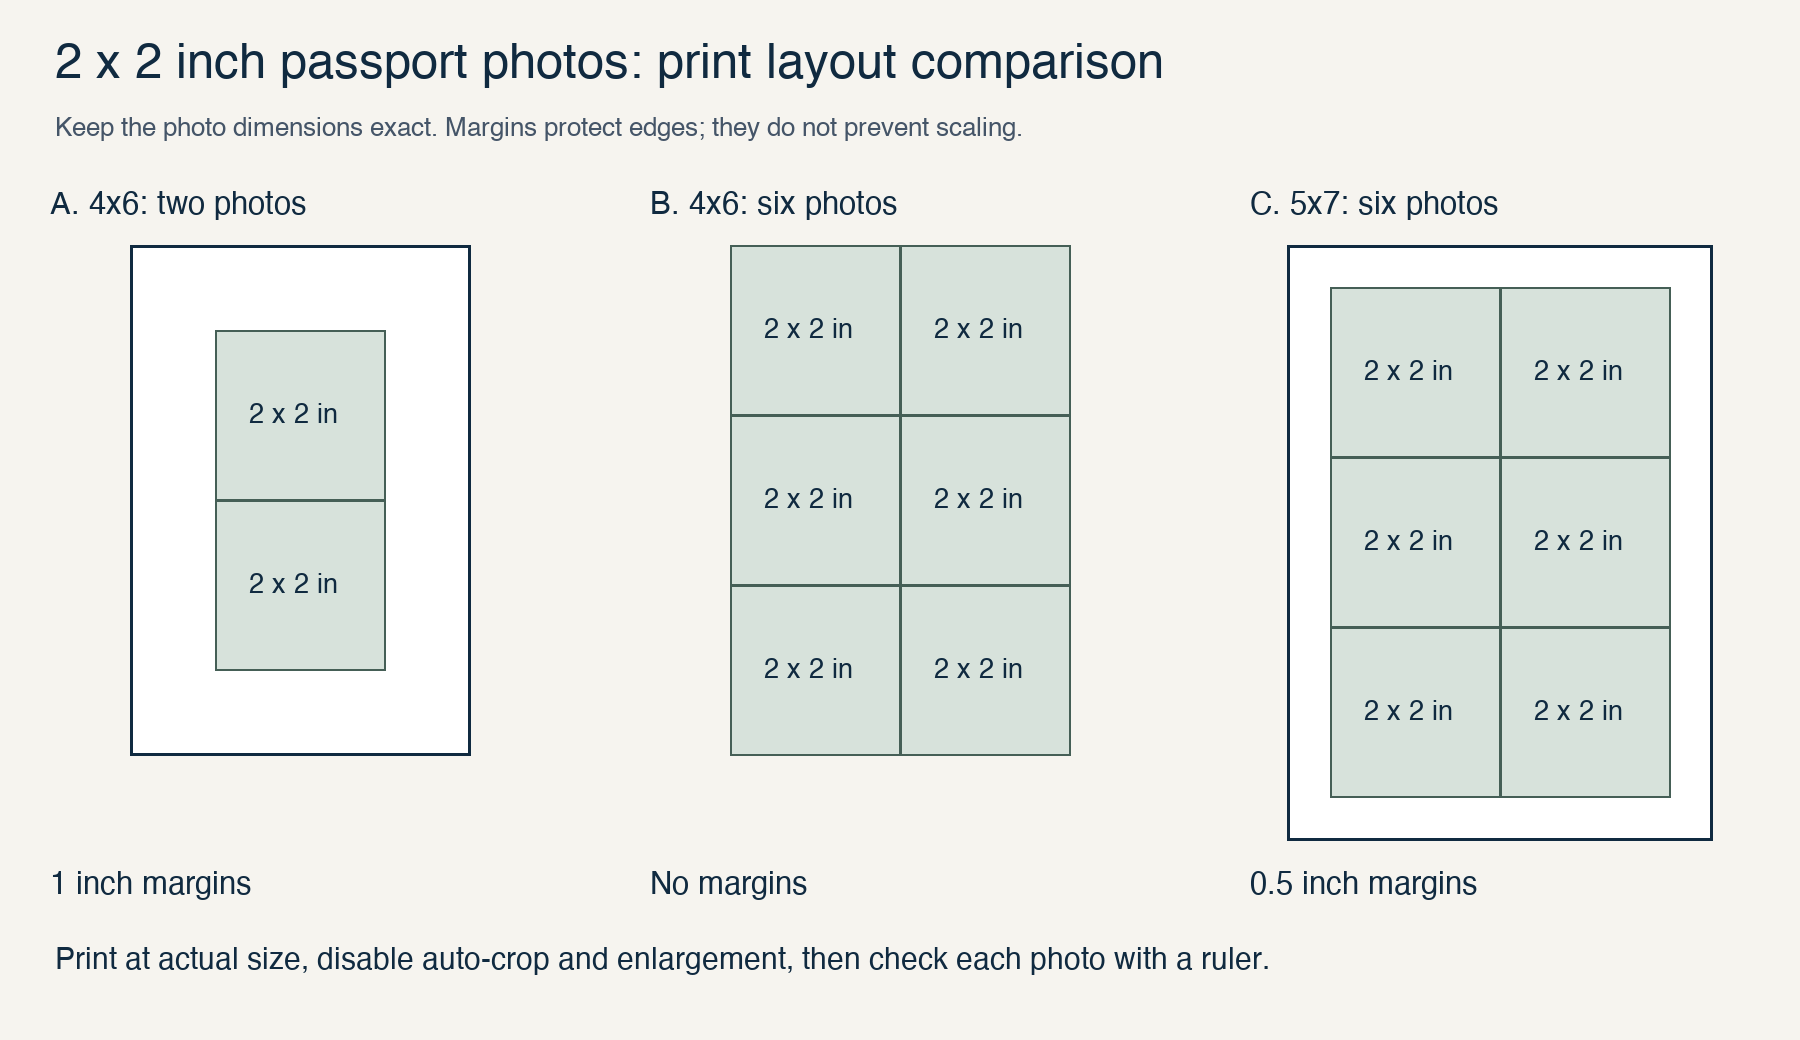
Three Layouts, Compared
| Layout | Paper | Photos | Margin | Extra space around photos? | Best for |
|---|---|---|---|---|---|
| A. Centered column | 4x6 | 2 | 1 in on all sides | Yes, if printed without scaling | Most people: you need one photo plus a spare |
| B. Edge to edge | 4x6 | 6 | None | No | Only if the order page has a "print entire image / no crop" option, and you'll measure every photo |
| C. Margins on larger paper | 5x7 | 6 | 0.5 in on all sides | Yes, if printed without scaling | When you want six copies and don't mind a slightly larger, costlier print |
Our recommendation: use Layout A for a standard application. A passport application needs only one photo, so two copies (one spare) is enough, and the margins protect you from trimming.
Exact Pixel Sizes and Positions (300 DPI)
If you build the sheet in an image editor, use these numbers. At 300 DPI, one inch is 300 pixels.
| Item | Pixels |
|---|---|
| One 2x2 photo | 600 x 600 |
| 4x6 sheet (portrait) | 1200 x 1800 |
| 5x7 sheet (portrait) | 1500 x 2100 |
Where to place each photo (top-left corner of each photo)
| Layout | Photo 1 | Photo 2 | Others |
|---|---|---|---|
| A. 4x6, two photos, centered column | x = 300, y = 300 | x = 300, y = 900 | none |
| B. 4x6, six photos, edge to edge | x = 0, y = 0 | x = 600, y = 0 | y = 600 and y = 1200 for the next two rows, same two x positions |
| C. 5x7, six photos with margins | x = 150, y = 150 | x = 750, y = 150 | y = 750 and y = 1350 for the next two rows, same two x positions |
Two rules to follow when you build the sheet:
- Never resize the photo while placing it. It should already be exactly 600 x 600 pixels (2 x 2 inches at 300 DPI). Stretching to fit changes its proportions and head size.
- Don't add borders or padding inside the photo. That would shrink the usable image. If you want cut guides, put thin marks in the margin outside the photos, if your layout tool supports them.
Why 300 DPI and exact pixel counts?
If your sheet is exactly 1200 x 1800 pixels, a 4x6 print needs no scaling: the file matches the requested 300-PPI print dimensions, although the printer may use a different hardware resolution. A sheet with a different shape (for example a 4:3 phone image) forces the print service to crop or stretch it to fit 4x6, which can change your photo's size and shape.
Build the Sheet in Seconds (Free Script)
If you're comfortable running a short Python script, this lays your finished 2x2 photo onto a sheet at 300 DPI. The script centers the selected grid on the chosen paper size.
from PIL import Image, ImageDraw

DPI = 300
PHOTO = 2 * DPI  # 600 px = 2 inches

LAYOUTS = {
    "4x6-two": (4, 6, 1, 2),   # centered column, 1 inch margins (safest on 4x6)
    "4x6-six": (4, 6, 2, 3),   # edge to edge, no margins (risk of trimming)
    "5x7-six": (5, 7, 2, 3),   # 0.5 inch margins
}

def build(photo_path, layout, out_path):
    w_in, h_in, cols, rows = LAYOUTS[layout]
    W, H = w_in * DPI, h_in * DPI
    photo = Image.open(photo_path).convert("RGB")
    assert photo.size == (PHOTO, PHOTO), "Photo must already be exactly 600x600 px"
    sheet = Image.new("RGB", (W, H), "white")
    x0 = (W - cols * PHOTO) // 2
    y0 = (H - rows * PHOTO) // 2
    for r in range(rows):
        for c in range(cols):
            sheet.paste(photo, (x0 + c * PHOTO, y0 + r * PHOTO))
    sheet.save(out_path, dpi=(DPI, DPI), quality=95)

build("my_photo_600x600.jpg", "4x6-two", "sheet_4x6.jpg")
No coding? Use any image editor that lets you set the canvas size in pixels and place layers at exact coordinates, or use a photo sheet maker that outputs a 1200 x 1800 image. PhotoOmni can help you prepare a correctly sized photo before you build the sheet.
Print Settings That Keep the Photo at Exactly 2x2 Inches
Most size errors happen at the print dialog, not in the file.
At a store (online order or kiosk)
- Upload your 1200 x 1800 sheet.
- Choose 4x6, not "wallet," "2x3" or "ID" sizes.
- Decline auto-crop, auto-enhance, red-eye and filters.
- Avoid "fit," "fill," "crop to fit" or "zoom" options. Choose to print the whole image.
- Pick glossy or matte photo paper.
- Check the preview: the whole sheet should be visible, with your margins intact.
Print services may have separate products and policies for ordinary photo prints and passport-photo services. Confirm that the provider can print your prepared sheet without resizing.
At home
- Load photo paper (glossy or matte) in the printer. Never use plain copy paper.
- In the print dialog, set paper size = 4x6 and paper type = photo paper to match what you loaded.
- Set scaling to 100% / actual size. Turn off "fit to page," "scale to fit" and "shrink to fit."
- If your printer has a borderless option, be careful: borderless printing often enlarges the image slightly to bleed past the edges. Margins can protect against edge clipping, but enlargement still changes the dimensions of every photo. Disable enlargement and measure the final print.
- Print a test sheet on plain paper first and measure it (see below) before wasting photo paper.
The Ruler Check: Measure Before You Cut
This is the step that separates a good print from a rejected one.
- Measure the width and height of each photo. Each must be 2 inches by 2 inches (about 51 x 51 mm).
- Measure the head from the bottom of the chin to the top of the head. It must be 1 to 1 3/8 inches (about 25 to 35 mm).
- Compare two photos on the same sheet. If one is smaller, your printer or store trimmed or scaled the sheet.
- Check the margins. If the left and right margins differ by more than a little, the image shifted.
- Look at color and sharpness. The background should look white or off-white, not pink, blue or gray, and the print should not look pixelated or streaky.
If the size is off by even a little, adjust the settings and reprint. Our guide to why passport photos get rejected lists the problems that most often cost people time.
Cutting the Photos Apart
- Use a paper trimmer or a sharp craft knife with a metal ruler. Scissors work, but straight edges take practice.
- Cut along the 2-inch boundaries, using the marks in the margins as a guide.
- Cut on the outside of the mark, so the photo stays at 2 inches. Keep the edges square and don't round the corners.
- Don't write on the front, fold or crease the photo.
- Keep the spare in a flat envelope.
For attaching the photo to your application, read how to staple a passport photo. For a first-time application, don't staple it yourself.
Troubleshooting: What Went Wrong?
| Problem | Likely cause | Fix |
|---|---|---|
| Photos print smaller than 2 inches | "Fit to page," "scale to fit" or a lab that scaled the image | Print at 100% / actual size, rebuild the sheet at 1200 x 1800 px, and re-measure |
| One outer photo is smaller or cut off | Edge trimming on Layout B | Switch to Layout A or Layout C so there are margins |
| Photos look stretched or squashed | Sheet wasn't 2:3, or the printer changed the aspect ratio | Build the sheet at exactly 1200 x 1800 px and choose "no crop" |
| Photo looks pixelated | Source photo was too small or a low-resolution screenshot | Use a photo that is at least 600 x 600 px at 2x2 inches |
| Colors look warm, pink or dark | Auto-enhance or printer color settings | Turn off auto-enhance, print on proper photo paper, and compare with the screen |
| Ink smears or streaks | Wrong paper type setting or damp paper | Match the paper type setting to the paper and let the print dry |
| Photo curls or is rejected as "plain paper" | Printed on copy paper | Reprint on glossy or matte photo paper |
What About Other Sheet Sizes?
| Paper | Photos that fit | Notes |
|---|---|---|
| 4x6 | Up to 6 (edge to edge) or 2 with margins | Cheapest and most widely supported |
| 5x7 | 6 with 0.5 in margins | Good when you need six copies and safe margins |
| 8.5 x 11 in letter | Many, depending on spacing | Use photo paper, not plain paper, and measure each photo |
If you need photos for another country or document, don't reuse the 2x2 layout, because other sizes differ. For example, many visa and national ID photos use metric sizes, so check the exact dimensions for the document you're preparing.
Common Mistakes
- Using the 6-up edge-to-edge layout without checking for trimming
- Letting the print service auto-crop or "fit" the image
- Building the sheet at the wrong pixel size, so the service has to scale it
- Skipping the test print and ruler check
- Printing on plain paper
- Cutting inside the photo, which makes it smaller than 2 inches
- Using a low-resolution or screenshot image
Frequently Asked Questions
How many passport photos fit on a 4x6 sheet?
Up to six, arranged two across and three down, because a 4x6 sheet is exactly two 2-inch photos wide and three tall. That layout has no margins. For safety, most people place two photos in a centered column.
Can I print a 2x2 passport photo on 4x6 paper?
Yes. Build a 1200 x 1800 pixel sheet, place your 2x2 photo on it, order a 4x6 print, and cut the photo out to exactly 2 x 2 inches.
What size should my file be for a 4x6 print?
1200 x 1800 pixels at 300 DPI in portrait orientation. Each 2x2 photo within it is 600 x 600 pixels.
Is a "4x6 passport photo" a different photo size?
No. The passport photo is still 2x2 inches. The 4x6 is only the paper it's printed on.
Why did my photos print smaller than 2 inches?
Most often because the print dialog or the store used "fit to page," scaling or cropping. Print at 100% / actual size and use a correctly sized 1200 x 1800 sheet.
Is it okay to print passport photos on regular paper?
No. Use photo paper with a glossy or matte finish. Plain paper is not suitable.
How much does it cost?
An ordinary 4x6 print may cost less than a passport-photo service package. Check the current print price and minimum-order rules with the provider.
Do I need to cut the photos myself?
Yes. A 4x6 print comes as a single sheet, so you cut the photos out before you submit one.
Do I need extra photos?
Usually one photo is needed, but a spare is wise in case of a printing or cutting mistake.
Bottom Line
Print passport photos on 4x6 paper by building a 1200 x 1800 pixel sheet, using the centered two-photo layout for safety (or a 5x7 sheet if you want six with margins), choosing "actual size" with no auto-crop or fit options, and measuring each printed photo with a ruler before you cut. For a photo that's right before you print, check the size, background and head position with PhotoOmni.
Official Sources
Official guidance checked on October 16, 2026. Follow the current application instructions before submitting.
About the Author
PhotoOmni Editorial Team
The PhotoOmni Editorial Team explains official passport, visa and identity-photo requirements, with practical guidance on taking photos, preparing files and printing. This guide draws on the official sources listed above. The issuing authority sets the application requirements and makes the final acceptance decision.